Grooming
Don’t you just love touching and smelling a freshly groomed cat? It’s like hugging a squeaky clean, brand new teddy. Grooming your kitty can either make you feel like you’re in heaven or in hell. If your kitty is gentle and docile like my Ning, then the entire grooming process will feel pleasant and enjoyable. However, if your kitty is like my crazy nutcase Ah Mao, then good luck to you. Each time you succeed in grooming you should give yourself a pat on your back as you would have survived hell. Below, I will be sharing a few tips on the various components of grooming. Hopefully, they would be helpful in some ways.
Bathing
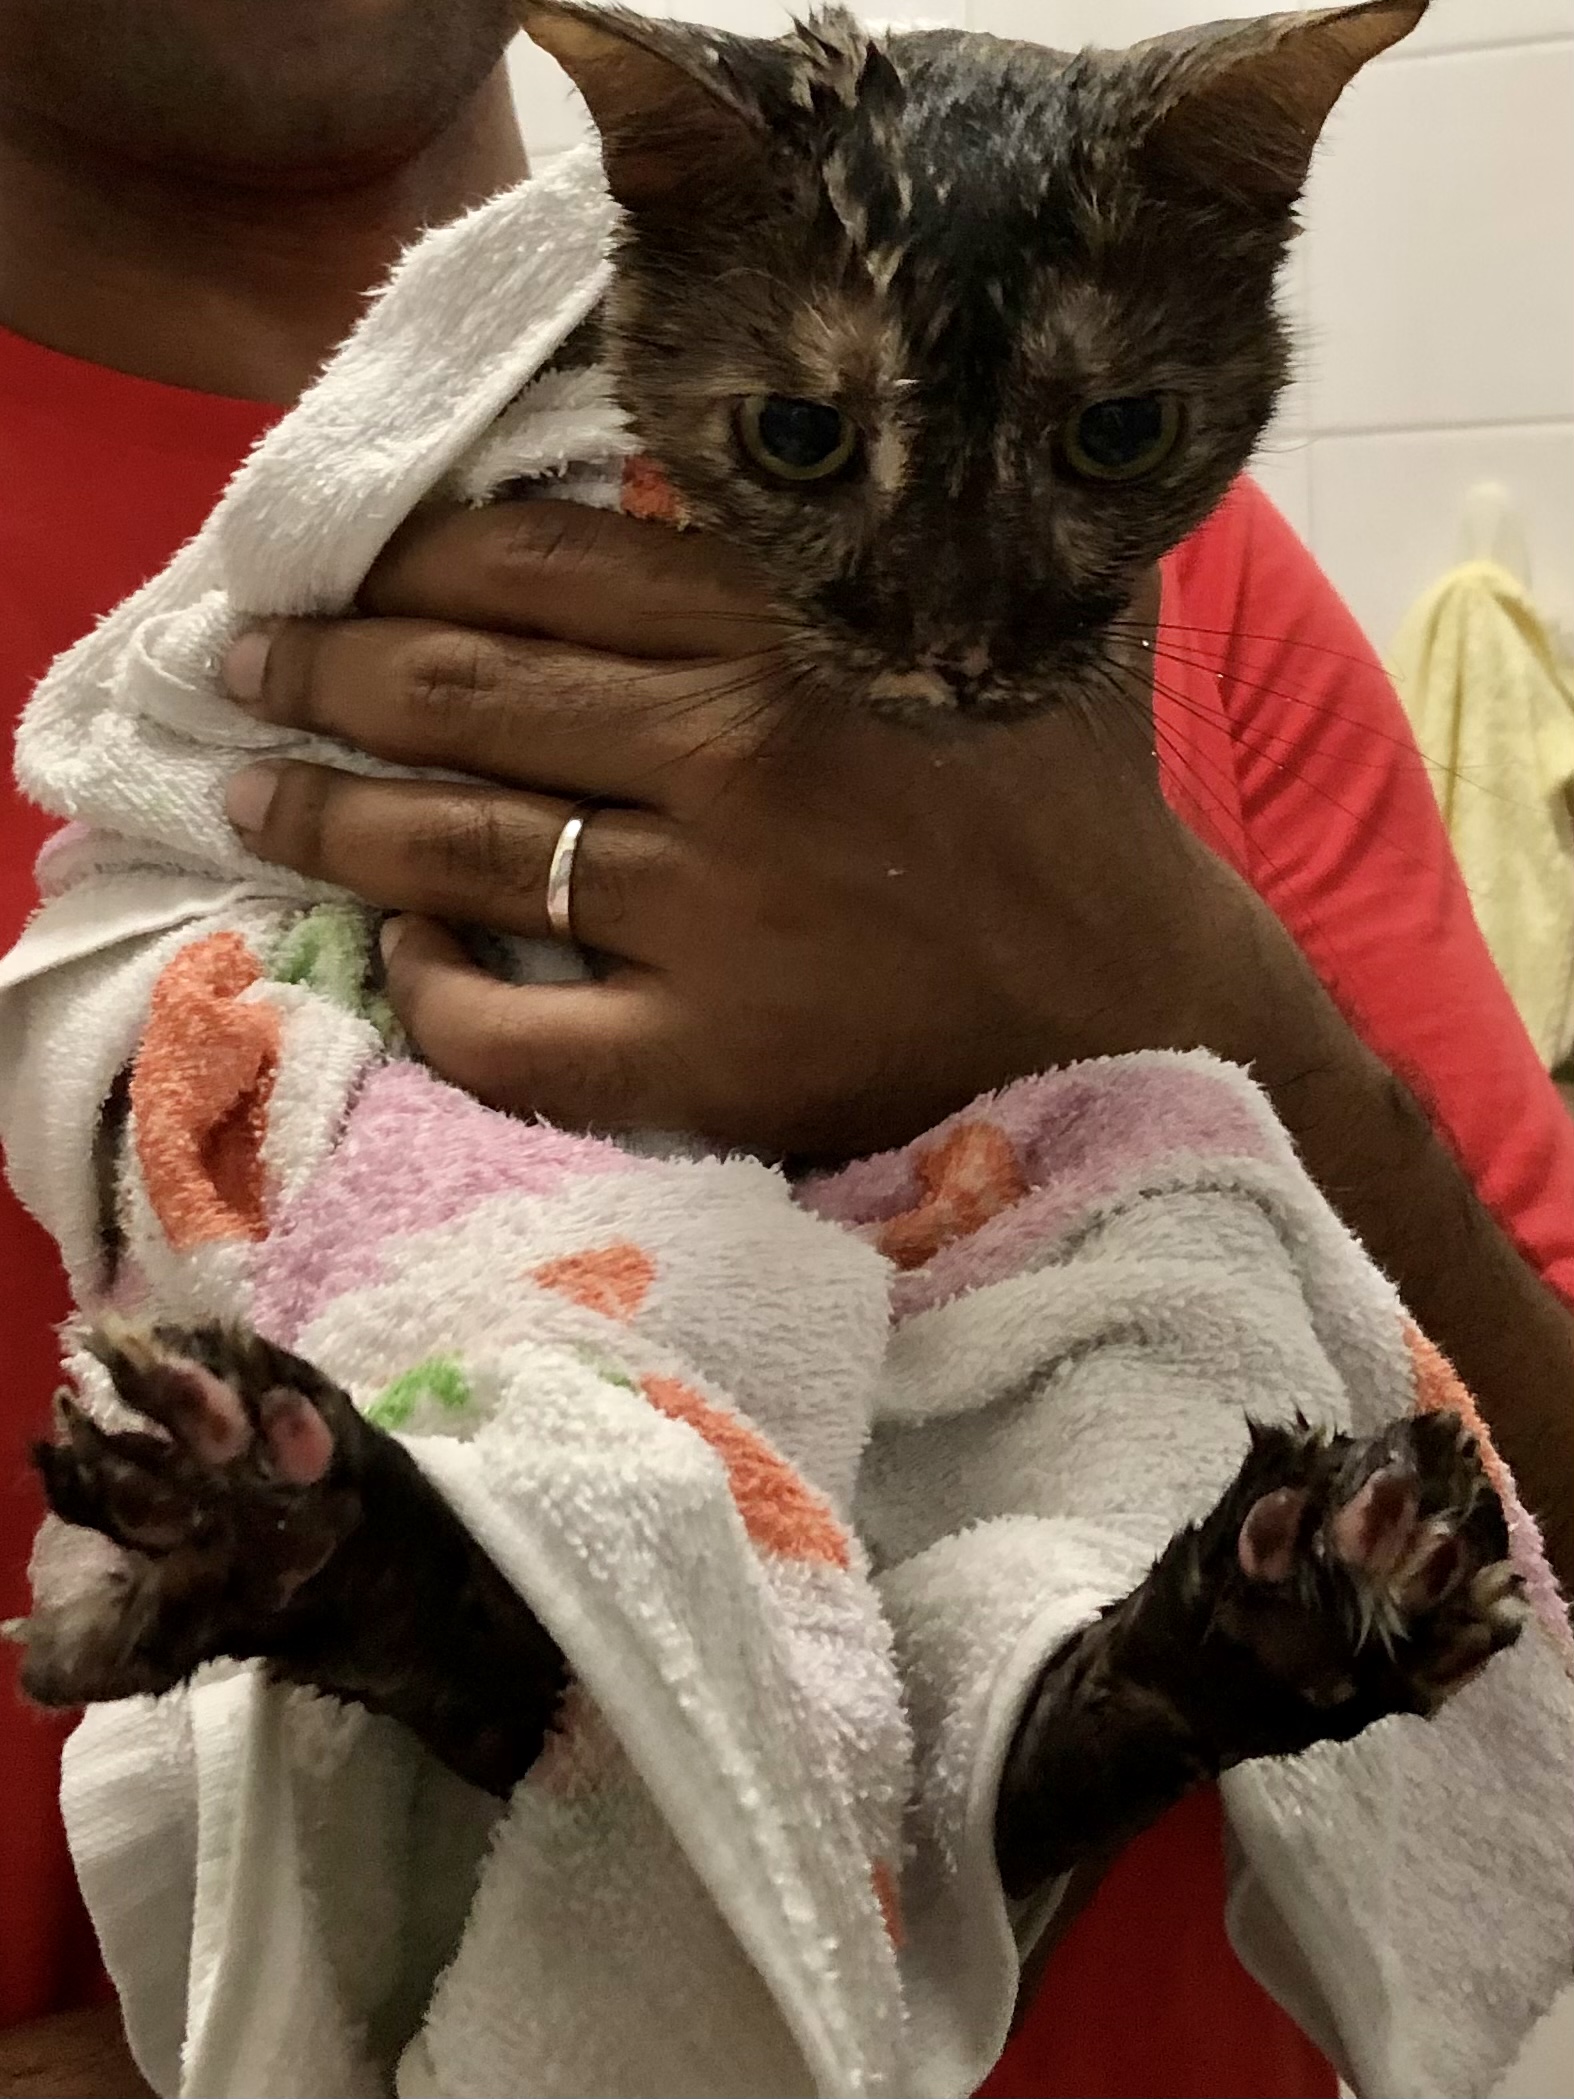
Bathing can be rather stressful for a cat if it is not used to it. It can also be very stressful to you too if your cat is aggressive. For Ah Mao, I literally shiver in fear whenever I have to bathe her. If I don’t do it, she would end up scratching till she bleeds. Most people believe that cats do not need to bathe since they groom themselves a lot. Bathing cats too frequently is also bad since it will wash off the natural protectants on their coat. For me, I have to bathe them at least once a month since I am allergic to pet dander. The moment my hands itch like mad when I touch them, I know it is about time for their bath.
To bathe an aggressive cat, you need to make sure that you have everything you need prepared before you bring it for its bath. Otherwise, it would be difficult for you to leave the bathroom in the midst of the bath to retrieve things and return. You could risk the cat running out of the bathroom as you are trying to get back in. Some of the things you could prepare are:
- Towel
- Pet shampoo
- Pet comb to comb out excess fur
- Gloves if you have sensitive hands.
- Do not use disposable latex gloves. They form friction with the cat’s fur when it is wet. So when you rub the glove against the fur, it would tug at its fur and cause pain, thus, making an angry cat even angrier. You can use plastic gloves (biodegrable if possible).
- Mask – wear a mask if you are allergic to its fur. (A cheap or cloth mask will do since you only need to block out the fur)
- I would definitely put on a mask if not after the bath I would start wheezing.
For an aggressive cat like Ah Mao, I discovered that the following tricks made it easier to bathe her:
- When the weather is hot
- Cats love warmth. Ah Mao prefers to dry herself off in the hot sun rather than me using a hairdryer on her. On rainy days it would be hard for her to dry herself. Hence, if I bathed her on a rainy day, she would struggle even more on her next bath.
- Moreover, I run the risk of her catching a cold if I bathed her on a rainy day.
- Catch her when she is in a deep sleep
- This is the best time to transport her to the bathroom. By the time she is fully awake and aware of what is going on, it is too late for her to run even if she wanted to.
- If I tried transporting her to the bathroom while she is awake, she would get too riled up even before the bath and make it even more difficult to bathe her.
- Brush her fur before running the tap
- Doing so usually calms her down. Besides, it helps take out excess fur. If I were to on the tap straight away, she would hiss, growl and swat at both me and the shower head. So take your time to brush your cat to help it relax.
To prevent scratches or bites during a bath, some people put a cone over the head of their cats. I’ve tried this before and it doesn’t work. It was messy since soap would flow from her back through the cone down to her neck and face. Besides, having a cone on her made me even more terrified especially when I had to wash off the soap that accidentally got onto her face. With the cone, I had to put my hand into the cone, right where her mouth was. If she were to turn and bite, I had near zero chance of getting my hand out in time. Hence to me, doing without a cone is definitely a wiser choice.
Rinsing is a key step in bathing cats. Be sure to rinse their faces thoroughly to make sure there is no residual soap. There was once where I didn’t rinse the shampoo off properly from Ah Mao’s face and it went into her eyes, making them red and irritated. Thankfully I discovered it early and managed to flush them out using some eye drops (Natural Tears). To rinse a cat’s face, do not spray water directly at it. You can hold some water with your hand and pour it down its head then quickly brush it off. Repeat a couple of times to ensure there is no residual soap.
Bathing an aggressive cat is extremely stressful. I have a phobia of bathing Ah Mao since she would growl, hiss and try to scratch and bite me each time I bathe her. I think the worst part of the bath is when she screams. That noise freaked me out as it would be followed by vicious bites. As an owner faced with difficult cats like this, you need to find a way to manage your fear. If there is someone else in the family who can help you bathe the cat, just let him/her do it. Ah Mao preferred my husband over me to bathe her. When he bathed her, she got a lot less crazy. It took so much stress off me. So accept help when it’s being offered. It doesn’t discount the love and effort you put in your cat.
The complete opposite is true when you bathe tame cats like Ning. She is so easy to manage that bathing her actually feels therapeutic. No growling, just plenty of loud screams; not the scary screams though, more of the funny “Help me” kind of scream. So depending on the character of your cat, you might experience heaven or hell.
The brand of shampoo I used for them is Dermacare Aloveen Oat Meal shampoo. It was recommended by my vet. Not only does it smell good, it made their fur soft and easy to maintain. If you would like to have walking air fresheners in your house, try it!
Oral Hygiene
Are you aware that you need to brush your cat’s teeth? Sounds like a load of crap right? I know, but I’m still forced to do it.
I was like most pet owners, thinking that if animals in the wild don’t need to brush their teeth what makes domesticated ones so special. But I was wrong and I realised my mistake too late. Both Ah Mao and Ning’s teeth had some form of decay by the time I found out. Thankfully it didn’t come to a point where they had to be sedated for dental work. Sedation might be risky especially for old cats with medical conditions. Some might never wake after being sedated (1 in 500). Therefore, it’s best to keep your cat’s teeth and gums healthy and strong so they can survive old age just like humans.
Brushing a cat’s teeth is definitely not a breeze in the park especially when you try to stick a toothbrush in its mouth. You gotta expect some form of resistance. Though Ah Mao is belligerent in general, for some reason she really enjoyed getting her teeth brushed, not with a toothbrush though. I used a gauze. Using a toothbrush would be asking too much… I still want my hands!
So how I did it was that I used a small piece of gauze, wet it and laid it over my finger and rubbed gently all over her teeth and gums. It’s just like how you clean a baby’s teeth with washcloth. There are commercially available fingerbrush as well but if I remember correctly, those are expensive and you need to replace it once every month or two months. For me, the gauze is an inexpensive yet effective method. You can just throw the gauze after each use unlike the fingerbrush where u still need to waste time and effort to wash. But if you prefer using a finger brush, by all means, why not?
After cleaning her teeth and gums, I would apply a thin layer of Oratene antiseptic oral gel over them. Oratene reduces plague formation and bad breadth. It is recommended for serious oral conditions such as stomatitis, gingivitis and periodontal disease. With Oratene, by right you do not need to brush your cat’s teeth since it make plague water soluble and unable to bind to the tooth surface. However, I wanted to make sure her teeth is thoroughly clean so I clean them with a gauze first before applying the gel. Plus, when I clean her teeth with gauze, I can still get quite a bit of plague out. Also, I feel that the redness in her gums goes away faster if I use the gauze first before the gel instead of just using the gel alone.

One reason that made me realised the importance of maintaining good oral hygiene for cats was when Ah Mao stopped eating due to stomatitis. Her gums were bleeding and so it affected her appetite. I bet it must have hurt really badly. The moment cats stop eating, they go downhill really quick. On top of that, starving to death is a slow and torturous way to die. You wouldn’t want that for your cat, would ya?
Therefore, in order to maintain good oral hygiene, routine dental checkups are strongly encouraged so that any budding issue can be nipped in the bud. There are also dental treats available provided your cat likes the taste of it. I have tried the brands Feline Greenies (Catnip flavour) and Purina Dentalife (Salmon flavour) but none of the two picky cats knew how to appreciate it. I’ll be testing out other brands. Will post an update on that once I try them! 😉
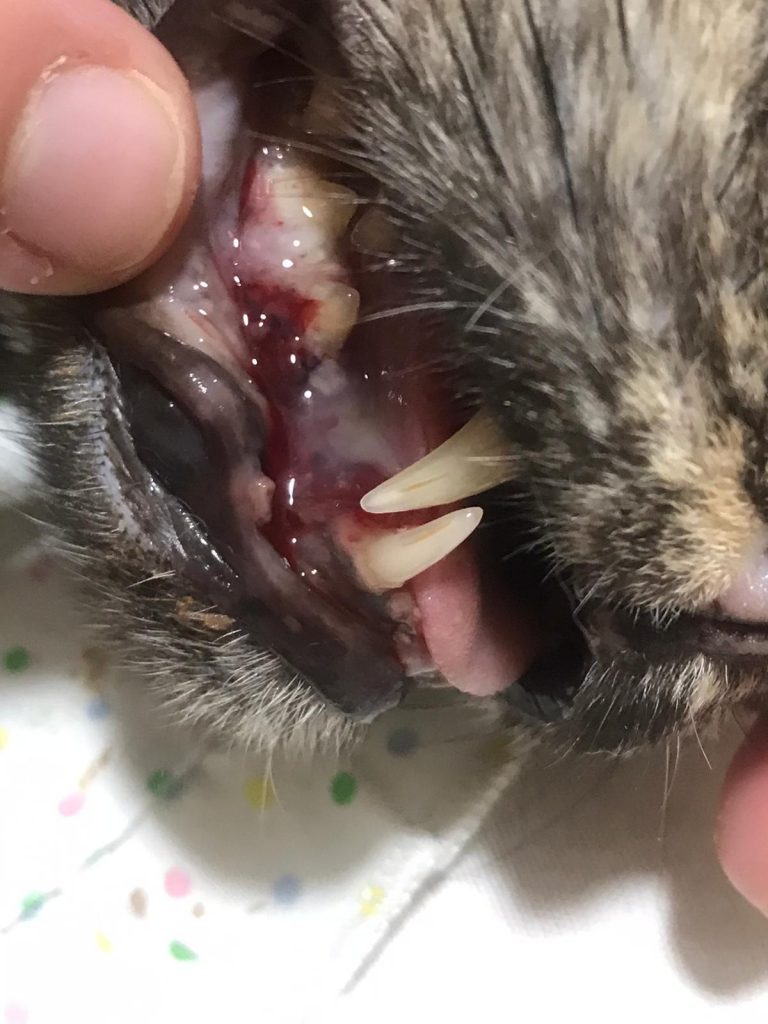
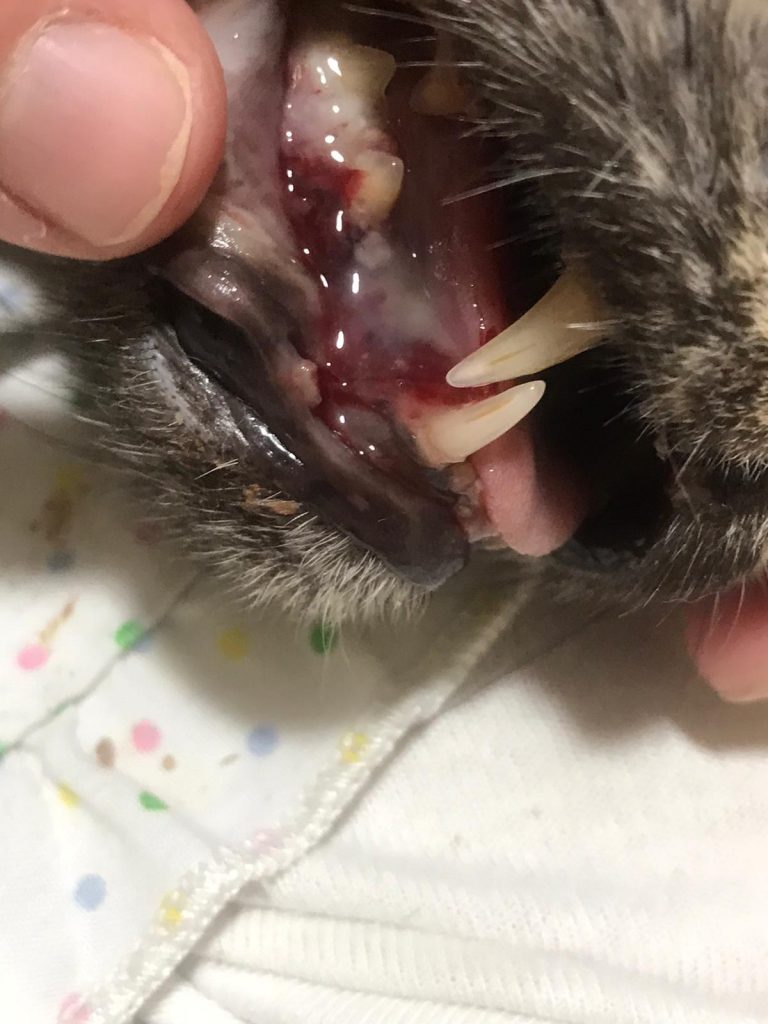
Shown below are some pictures of Ning’s decay tooth and inflamed gums due to gingivitis. You can also see the bleeding on Ah Mao gums. The skin on her gums were literally melting. They were so soft and mushy, I didn’t even know how to clean them off.


Nail Trimming
When a cat’s nails are long and sharp, they get caught in things like cloth easily. Should the cat struggle and try to forcefully yank it free, it runs the risk of injuring its nail. One good example was an incident which happened with Ah Mao. She was playing with my blanket and using it as her scratching mat one day when one of her nails got stuck in the thread. She panicked after she couldn’t get it out after a few tries and then she forcefully tugged her nail out of the cloth. Her entire nail got ripped off instantly and she ran off with blood pouring out her nail, leaving a trail behind her. It took me awhile to get her to calm down before I could tend to her injury. Since then, I made sure to trim both the kitties nails regularly to prevent such things from happening again. Besides, trimming a cat’s nails regularly not only helps in reducing the risk of injuries, it also saves your precious furniture from getting destroyed as well!
A cat’s nail cutter is designed differently from the ones human use. The first time I saw the nail cutter, the design looked really odd and scary to me, like some sort of torture tool. It took quite a bit of practice before I finally got the hang of using it. The first time I cut my cat’s nails I got a huge shock when layers of her nails came falling off. I thought the nail cutter was bad and it split her nails into pieces. Not sure if you’ve experienced it before but when you use lousy nail clippers your nails will split. But after that then I realised this is normal. Sometimes you can see pieces of their nails lying around the house. They’re shedding the old layers to reveal the new ones as their nails grow. So if you see that, don’t worry! If the layers are easy to peel off then you can help to remove it. Otherwise, do not forcefully peel it off if not it might lead to bleeding. You can take a look at the video below to have a rough idea on how to trim a cat’s fingernails.
Before you trim your cat’s nails, it is good to keep a bottle of styptic powder on hand. Styptic powder is used to stop bleeding from nails that are clipped too closely. It works by contracting the blood vessels and it is super easy to apply and extremely effective. You can find it online or at commercial pet shops. I bought mine at Pet Lovers Centre. Costs around $20 a bottle. Expiry is about 2 years.
To apply, pinch some of the powder and apply it directly on the bleeding nail. Make sure that the injured site is coated thoroughly. Apply some pressure on the wound and the bleeding should stop in no time.
Ear Cleaning
Awwww…talking about this just makes me wanna get some…Don’t you just love the feeling of getting your ears cleaned? Once you start you never want it to stop.
If you’ve done it on your cat before, I bet you would have seen how orgasmic this experience is for it. Its eyes rolled back, legs in the air, begging you to stop but at the same time don’t want you to (when you hit the right spots its feet will be near its ear, kicking in the air paying extra care not to accidentally kick you, just in case you would mistakenly take it as a sign to stop). In my head I can almost always hear hear them scream “Ohhhh Yessss!” whenever I do the dirty deed. Though it’s a dirty job, guess we can all secretly agree that the experience is equally enjoyable for the ones doing it. Remember the excitement you feel when you dig out a huge piece of gunk!? Yeah…that’s what I’m saying… hahaha don’t deny…It’s perfectly fine cause…I LOVE IT SOOO MUCH TOO!!! =)
Before having a cat, I never knew that cats ears needed to be cleaned. When Ah Mao first arrived, the interior of her ears were black. As she was my first cat, it didn’t occur to me that the black part was dirt since it covered almost the entire interior of her ears. I thought that was just pigmentation. One afternoon, while she was snoring away like a pig on my dad’s massage chair, I decided to use a cotton bud to poke at it to see if it really was pigmentation. To my horror, I realised that the inner parts of her ears were actually pink! That poor girl’s ears had been covered in thick, greasy, gooey dirt!! No wonder she had been scratching them. I was filled with excitement each time I see a big chunk of ear wax come off. That sense of achievement and satisfaction…INDESCRIBABLE! You gotta try it for yourself. I let her take a sniff at her ear wax at the end… You should have seen the look on her face..She was in complete ecstacy. Since she liked it that much, it was our ritual every time we clean her ears ever since.
There are a few ways in which you could clean the ears of a cat. For instance, you could use a piece of tissue or cotton pad to wipe off any dirt you can see or you could use cotton buds. Another way is to buy a pair of stainless steel forceps meant for pets to help with the cleaning. One of the vets we consulted shared with us that a cat’s ear canal is L shaped and in order to clean it thoroughly, it was better to wrap some cotton wool over a pair of forceps to dig into it’s ear canal. Frankly, I don’t find any difference in using that compared to cotton buds but maybe I didn’t know how to use it correctly that’s why I don’t see the difference.
Applying some ear cleansing solution/cream on the cotton wool can also help make it easier to remove ear wax. I tried it on Ah Mao before. Her ears became squeaky clean and boy do they smell good. However, when I used it on Ning, her ears became pinkish and hot to the touch. She was allergic to it so I stopped using it ever since. To be frank, I feel that it is fine to do without the cleansing cream. To me, gently wiping the surface with a tissue was clean enough but if you feel that it’s not up to your standard, then please feel free to try other ways. If a cat’s ears are not kept clean, they might end up having ear mites. If your cat is constantly scratching its ears and you see dried brown specks(like coffee grounds) of stuff in them, most likely it has ear mites and should be brought in to a vet for a checkup.
Getting rid of ear mites may take some time. The most likely treatment for ear mites is to administer ear drops prescribed by a vet. A word of caution when you administer the ear drops; DO NOT SQUIRT IT IN! The first time I used it on Ah Mao, I squirted the ear drops in and it gave her a big shock. Ever since then, she would run or struggle like mad each time I tried to put it for her. So, if you’re using it on your cat for the first time, press very lightly to the skin of its ear and gently drip it in. It will flow down slowly on its own. Once it flows into the canal, massage its ears from the outside(watch their eyes roll back as you do this). Hopefully if the first experience is good, your cat will be more likely to complete the entire treatment duration.
Frequency of cleaning:
I would say there is no hard or fast rule. If the ear wax is visible, it is a good sign its ears are due for maintenance!
Love,
TG